
John Singer Sargent (American, 1856-1925), Corfu: Lights and Shadows, 1909, Museum of Fine Arts (MFA), Boston, MA, US
Resources:
Art Infinitus facebook page
John Singer Sargent (American, 1856-1925), Corfu: Lights and Shadows, 1909, Museum of Fine Arts (MFA), Boston, MA, US
Resources:
Art Infinitus facebook page

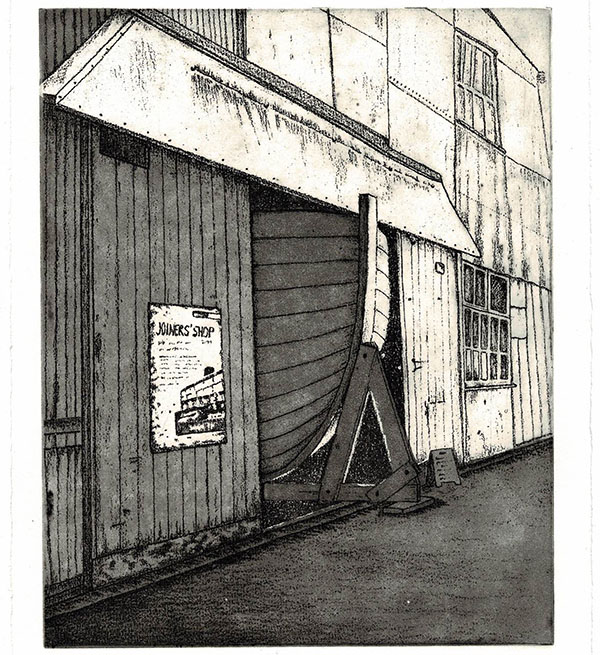
I drew this boatshed some time ago from a photo I took on Cockatoo Island. Whilst it’s a good rendition, I sketched it quite lightly which made it difficult to transfer to a zinc plate for etching.
Using Photoshop, the saturation and contrast were increased, enabling the image to be visible in more detail when transferring to the zinc plate.
It was also flipped to be in reverse on the plate. This is important when working with text.
The zinc plate was prepared: edges bevelled, surface cleaned and hard ground applied.
The reversed image was transferred to the plate, before drawing the basics into the hard ground with an etching tool. The plate was placed into a nitric acid/water bath for the initial etching.
The hard ground was removed and rosin aquatint applied to the entire plate before further blockout was applied to the areas I wished to remain light. NOTE: Click here for a full description of rosin aquatinting and blockout/masking

Proof print of stage 1 before further etching – colour Graphic Chemical sepia
The plate was submerged into the acid bath again for a short time. After rinsing, blockout was applied to more of the surface – the areas to be a mid tone – then back into the bath. The process was repeated with less areas exposed to the acid, creating darker tones when printed.
Proof print of stage 2 before corrections – colour Graphic Chemical black
The plate was cleaned and printed, which showed up small etching mistakes around the base of the boat and the boat stand. Using an etching needle and magnifier I imitated the surrounding areas by cross-hatching and dotting into them.
Using steel wool, some of the shadowed side of the boat was burnished – then scuffed up with an etching needle to create texture. Parts of the foreground boatshed siding were also burnished.

Proof print of final plate – colour Charbonnel raw sepia
The plate is complete but will be reprinted in black ink which will accentuate the detail better than either of the sepia inks.

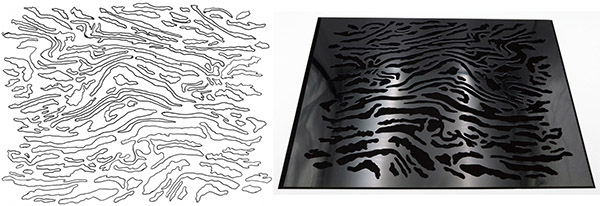
Jacob Taylor Gibson, I Don’t Know What’s Good For Me (Rat King), 2022,
lithography, screenprint, intaglio, rust, laser engraved acrylic
There are some terrific photos on his site, many close-ups, of this and his other art works which enable the viewer to appreciate the techniques and layering he utilizes to create each piece.
Resources:
https://www.jacobtaylorgibson.com/from-every-depth-of-good-and-ill/individual-works

Today I visited Hurstville Museum & Gallery to view some of the entries in the latest Open Print Exchange. The gallery write-up included (in part) the following explanation.
The Open Print Exchange exhibition highlights a global exchange of hundreds of prints made by artists from around the world created utilising a tiny 3D-printed printing press. From professional printmakers to those artists experimenting for the first time, this exhibition highlights the possibilities of printmaking to the wider public, in turn uniting the global printmaking community to engage with accessible ways of creating works on paper.

The presses shown above, and many, many more from the same design, were used by their individual owners to create thousands of prints which were submitted for distribution and exhibition.
Here’s how the exchange works. Each person sent an edition of 10 prints, produced using a 3D-printed press, to a central location. They then received, in return, a package containing 9 random prints from other participants around the world. The 10th print was retained for exhibiting, to be entered into an online archive, and to form part of a catalogue.
The Hurstville Museum & Gallery is hosting a large exhibition showcasing some of the amazing and innovative prints, all produced from the same type of mini 3D-printed press.

Note in the images above they are all presented in exactly the same way, with the same framing. The frames were also 3D-printed.
Interested in getting involved in the next exchange and / or 3D-printing your own press? Head over to the Open Press Project website. Here are some useful links:
Website https://openpressproject.com/
Buy a 3D-printed press https://openpressproject.com/products/open-etching-press
3D-print your own press – instructions and downloadable files https://openpressproject.com/blogs/news/how-to-3d-print-your-own-printing-press
You can also register for the next exchange on the main site.
And a few of the ones I particularly liked. Click on any of them to view larger images.


Imagine my amazement – as I walked around the gallery trying to take in all these amazing works – to come across a beautiful print by Mark Lord from Lino Lord who I featured as my artist of the week in my previous post a couple of days ago.


Mark Lord, Four Rowing Boats From Above, St Ives, Cornwall, lino print 12″ x 8″ approx
Resources:
https://linolord.com/products/four-rowing-boats-from-above-st-ives-cornwall-lino-print
Mark Lord is an amazing printmaker, you can see more of his work (which is well worth viewing) here:
https://linolord.com/
https://www.instagram.com/linolordpress/
https://www.facebook.com/LinoLordPress
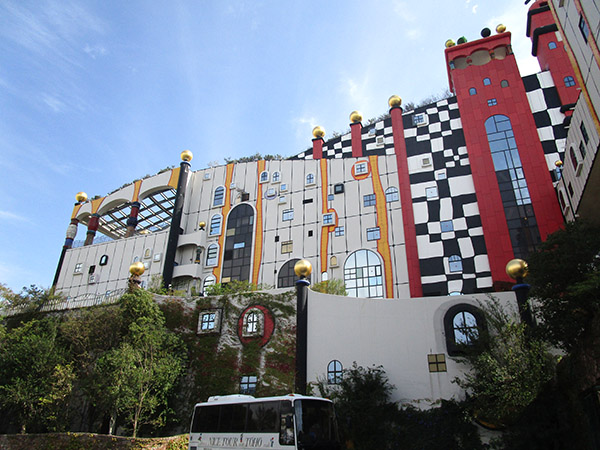
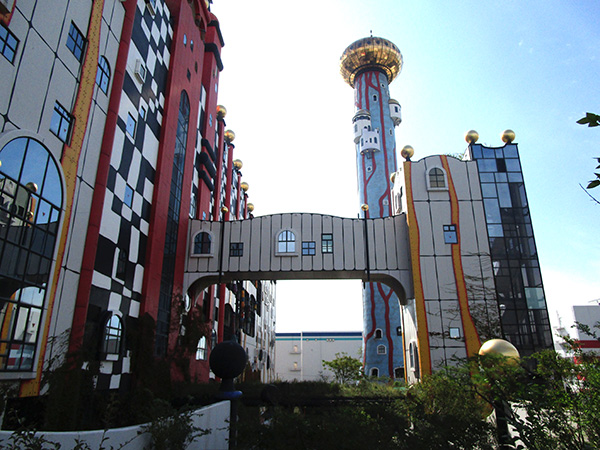
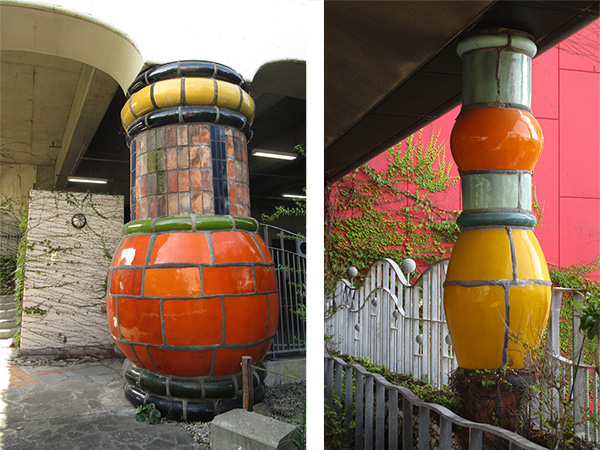
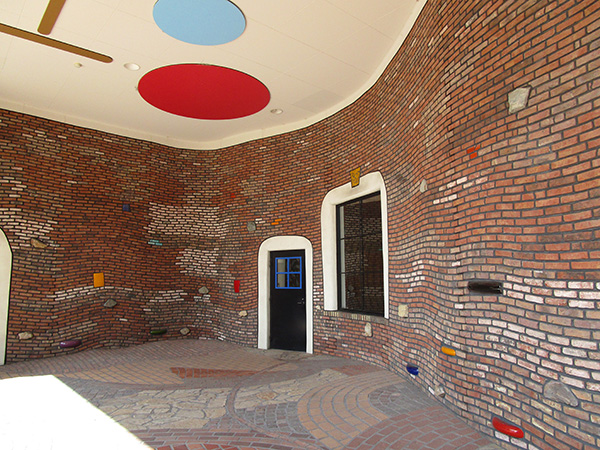
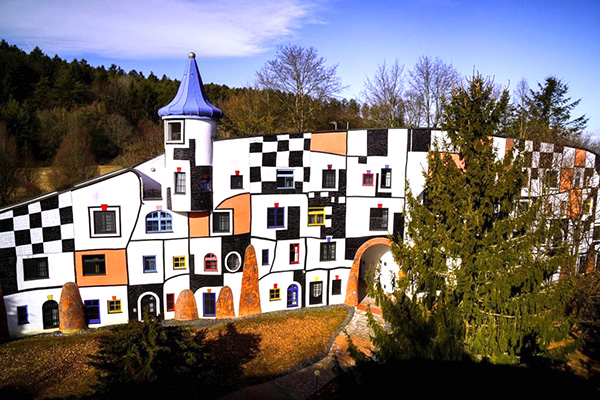
In 2018 I holidayed in Japan and, whilst there, visited a wonderful structure remodeled by the architect Friedensreich Hundertwasser. I believe it was originally a sewage works, but it has been transformed into something entirely different altogether. Here are a few images.
Since then I’ve looked (online only, unfortunately) at many other creations of his. Their quirky nature appeal to me and the Kunsthaus (Art House) provided great material as a start point for my latest zinc plate etching.
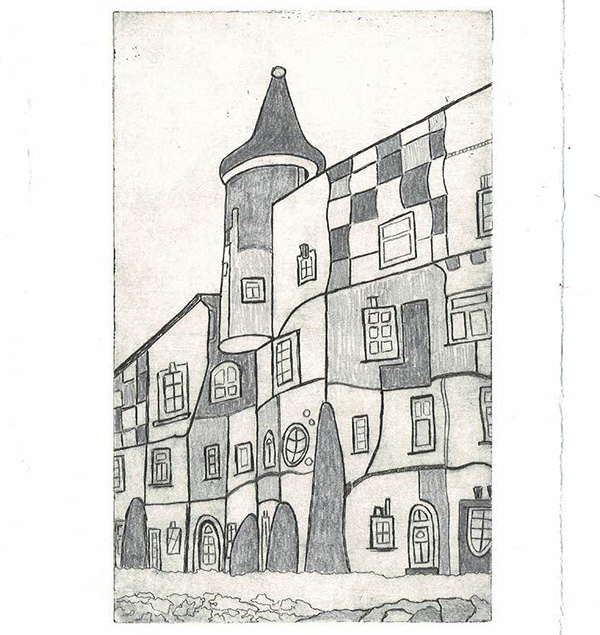
The design was traced onto the zinc plate which was pre-coated with a resist. Using an etching needle the outlines were drawn, ensuring the tool penetrated the resist but didn’t scratch the exposed zinc. The plate was then submerged into a nitric acid/water solution. To create a variety of line strength this was done 3 times, with resist being repainted over the lighter lines each time. The longer in the acid the darker the lines. The plate was rinsed, dried, resist removed and a proof taken.

In the normal course of creating a ‘realistic’ interpretation of an object, place, person or other, the lighter line tones would be strategically placed to create a sense of depth, distance, character or similar but in this case, even though there is perspective in the positioning of the building, I preferred a more random scattered approach. It’s just my way: I like flatter, impractical and unrealistic imagery in my work.
The linework was exactly as I wanted, so I photocopied the print and shaded sections by hand, indicating where I hoped to achieve a variety of tones as the plate developed.
Liquid hard ground was painted onto the areas I wished to remain the lightest tone, those that would only hold plate tone depending on how much I wiped the surface, and the plate went into the nitric acid solution once again. This step was repeated several times whilst blocking out more and more of the plate until only the areas where I wanted the darkest tones remained.
The hard ground was removed and the plate fully cleaned before pulling the print.
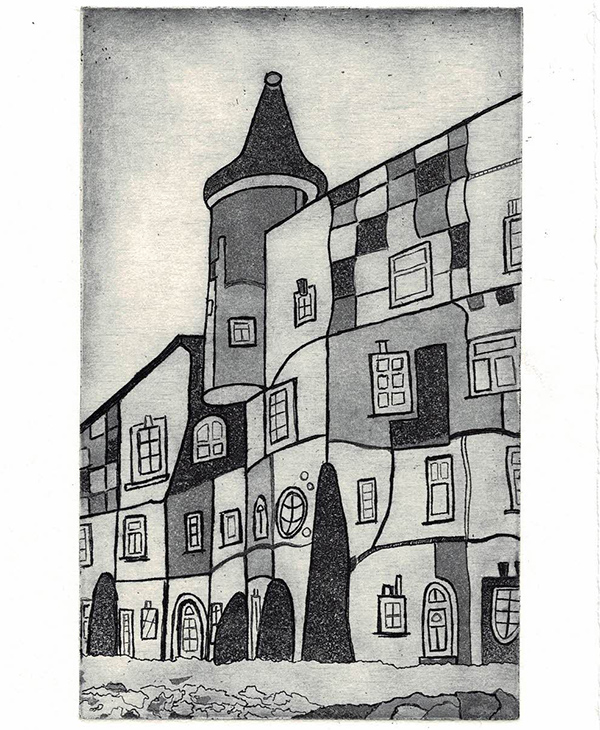
As I didn’t want the sky to be a totally blank area I randomly scratched a few marks into the ground during the etching process and I also left more plate tone around the upper edges. I’m told this effect is called ‘scum’ which I find a quite distasteful term, but the result is terrific.
While I work on other projects I’ll consider whether I want to either colour this in some way or perhaps apply some chine collé. Currently I’m simply enjoying the printerly appearance of it as is.
Materials:
Photosensitive zinc plate, Graphic Chemical Liquid Hard Ground, Fine Art Inks oil-based Stormy Grey ink, 300gsm Hahnemuhle paper.
Resources:
Source image (which I have adapted to create the print) by Petr Svarc https://www.pinterest.com.au/pin/409123947407103501/
Image of the Kunsthaus shown www.moonhoneytravel.com/rogner-bad-blumau-hotel-austria/

I love the simplicity of this reverse monoprint with the blocky background.
Resources:
Pinterest, posted by wyoming99!, 2008
This print swap is one I joined for the first time last year when the theme was ‘Hello Yellow’. Click here to see my entry if you missed it.
The aim is to print a set of 12 postcards: 1 is kept by the artist, 1 is kept by the group administrator and 10 are sent out to other contributors. In time I will receive my mixed bundle, which I hope will have been created by printmakers from a variety of countries.
My linocut last year was very successful and the aim was to go down a similar route and carve lino. However, with a fractured finger in a splint on my dominant hand, that wasn’t going to be an option. I turned to Ezy Carve instead.
Ezy Carve printing blocks are sold under the Renoir brand and come in a variety of sizes. They aren’t expensive and, as the name suggests, they are easy to carve with lino tools. They are, however, 1cm thick and slightly squishy, so I wouldn’t recommend putting them through an etching press, even with runners. Depending on ink and paper choices, printing by hand – either using your palm & fingers for pressure or a baren – is achievable with good results.
Transferring a design using tracing paper and a pencil is also simple, the block holds the graphite well and there’s no need to press hard. Once I had the basic outline on the block I drew additional details directly onto the surface to guide my cutting. The image below shows it after cutting and printing, hence the reason it’s a bit dirty looking.

Initially I tried rolling Matisse Flow acrylic paint over the design and pressing my postcard to the surface. I thought it might work a bit like a gelli plate and acrylic would be fine and quick drying, but I got barely a transfer. With a dry postcard, around 180-200gsm, and hand pressure, it wasn’t a success.
I immediately cleaned the block, and the bonus is that it could easily be done under the tap and towel dried.
I moved to my favourite oil-based printing inks and went through the same process.

I felt the inks sat on the block surface better than the acrylic paint had and, as can be seen from the results, the transfer was excellent. You’ll note that I left an edge around my block that hasn’t printed on the cards, that was for registration purposes and ensured I placed the postcard in exactly the same spot for each print.
Next I prepared a mask with cutouts for ‘sprinkles’ and overprinted the cupcakes once they were dry.

Having designed mini Cranes, and using my stencil cutting machine, I cut and constructed the tiny birds and adhered them to the sticks on the central cupcake.

I usually use De-Solv-it, a citrus based product, to clean my print plates and it worked beautifully on the Ezy Carve block with a soft cloth and a few cotton buds to get ink from the tight spots.
Postcards ready to drop in the mail box.

Nenad Zeljic, Elevator, drypoint, 85×62 cm, 2024
I’ve featured Nenad Zeljic as my image of the week in the past (click here), and he continues to create the most captivating prints.
Resources:
Facebook – search for his name and you’ll find a treasure trove of his work.
I’ve been travelling around NSW and Victoria for most of the last 3 weeks, doing workshops and sightseeing. On our way home my husband and I stayed at the Quality Hotel Gateway in Wangaratta.
Having checked out and taken our luggage to the basement car park we were surprised to see a note placed under our windscreen. We immediately thought we’d left the car in the wrong spot, but this is what we found instead.
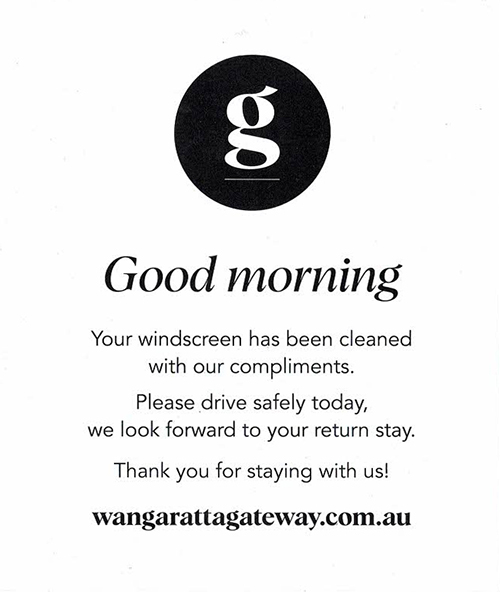
This is the second time we’ve stayed there and the second time we’ve had excellent service and a superb dinner in their restaurant. If you’re in the area and need somewhere to stay then look out for this hotel.
I’ve borrowed a beautiful book from the library: Hebrides by Peter May with photography by David Wilson.

In the introduction Peter May writes “This is not an official travelogue taking you on a journey around the tourist high points of the Outer Hebrides. It is a highly personalized account of the islands as I experienced them.”.
Both text and imagery are delightful and fit well with an idea I have for a new print project over coming months, the initial title being Remote. The word Abandoned also seems appropriate.
Too hard to choose just one image this week so I’ve restricted myself to two instead – with the bonus of the front cover above.

Boat at Cnip. Further around the loop at Valtos at Cnip, this old fishing boat lies rotting.
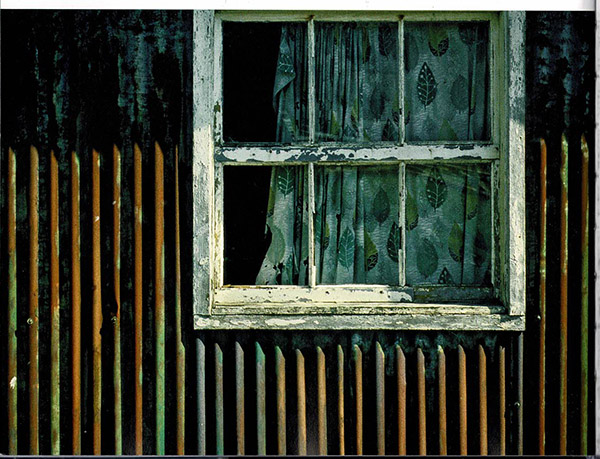
Gershader. The remains of curtains still hanging in the window of this abandoned shieling at Gershader, near Stornoway, suggest it might last have seen human habitation in the 1950s.
Resources:
Hebrides, Text by Peter May, Photographs by David Wilson, ISBN 978 1 78206 238 7, 2013, published by Quercus Editions Ltd, 55 Baker St, London.
Images and text from pages 30 and 216
Each year in December the members of our print group produce a pile of cut up prints to swap. These are usually prints that either didn’t quite work, are colour experiments or are surplus to requirements. We make our selections and mount them into small concertina booklets as a memory of the past year.
Here is my finished booklet.

I usually take one of my works and create hard covers using thin cardboard. This time I used excess prints from my recently completed Construction project.
Here’s a better view of some of the prints.


This project has developed to incorporate 3 distinct print methods to produce the imagery: solar plate etching, drypoint and linocut. Each was applied to Japanese Iwaki paper and, once dry, this paper was adhered to a sheet of 250gsm BFK Rives as a chine collé layer.

Working with 3 print layers, with each matrix being a different size, was a challenge and taught me a lot. The chine collé method, introduced to me by the amazing printmaker Basil Hall, worked out wonderfully and I’m extremely happy with the result.
I’ve created this as part of my contribution to a collaborative exhibition between The Southern Printmakers and Southern Highlands Printmakers groups. My other entry, entitled Construction, can be viewed here.
It was during a workshop with Brenda Tye in September 2017 that I first explored drypoint printing. We were given a piece of drypoint plastic and an etching needle and told to scratch our design into the plastic before inking and pulling a print. With limited time and non-existent experience I turned to an image of some trees I had taken along.

Above left is the scratched plastic and on the right is my print. The class involved learning several techniques and we didn’t get to develop our drypoints further, but I recently liberated it from storage to use in new projects.
My first project, entitled Fear, Despair, Hope, is not yet completed and will be posted later. I’ve been simultaneously working on After the Bushfires and the drypoint plate has been extensively reworked for this.
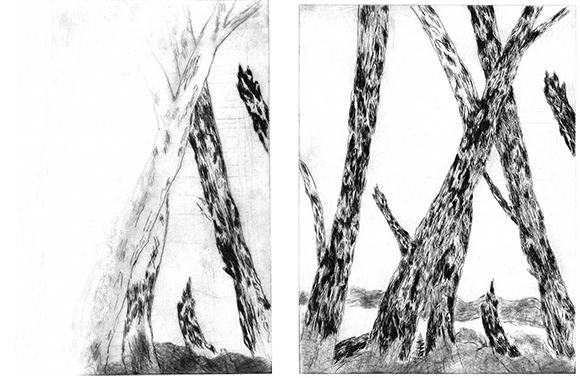
Above left is the first trial print after having worked on parts of the trees. Always worth having a look as you work through stages. The right hand image shows it progressing.
Next stage will be the addition of colour, further imagery and more definition.

Stretching out across an otherwise unassuming corner of Norfolk, Virginia, is the Lambert’s Point coal terminal. It is the largest and fastest-loading facility in the northern hemisphere for handling and transporting this fossil fuel, the combustion of which is a key industrial contributor to climate change.
Lambert’s Point handles a staggering 48 million tonnes of coal a year. It can offload the contents of 1200 rail cars per day onto ships bound for the Atlantic. At its maximum, it can hold 6200 of these trucks, a mere handful of which can be seen here, uniformly snaking along the tracks in a mesmerising display of our influence on, and destruction of, the world.
Resources:
Photo by Alex S. MacLean published on his facebook page 15 October 2018
Text from bit.ly/3HzjTt1 and from New Scientist magazine, page 25, issue 2nd September 2023
This zinc etching had numerous problems as it developed.
I started with a couple of photographs taken at Lakes Entrance in Victoria last year.

I cropped one to fit my print matrix.

The boats were drawn along with a few lines to indicate waves. I applied hard ground to the plate and the drawing was transferred to the surface. Using an etching needle I drew the line work through the ground before etching the plate in nitric acid solution (10 parts water, 1 part nitric acid) for 1 minute.
The ground was removed and aquatint applied to the entire surface. Using a bitumen solution I stopped out whichever sections I wanted to remain the lightest tones and placed the plate back into acid solution for 7 seconds. This step was repeated several times, each time stopping out more of the plate, thereby creating gradually darker and darker tones in the remaining exposed areas.
Lastly, the bitumen was removed, the plate thoroughly cleaned, and ink was applied to the surface and a print pulled.
There were issues with both over- and under-wiping, different inks (Gamblin, Fine Art Inks, Charbonnel tube and tin – all etching inks) and different papers (Hahnemuhle proofing, Hahnemuhle 300gsm, BFK Rives 250gsm and Velin d’Arches 250gsm).
This is the best of about 12 prints, not ideal by any means.

It’s been quite a long journey with this one and I’m rather disappointed in all the work, time and materials I’ve put into it for such an iffy result. I think that for once I have to accept the etching itself isn’t great and I need to move on to something new. I learned a lot along the way, both about etching and myself, so those are positives that have come out of it. Time to move my focus elsewhere.

Jemma Gunning, Cwm Coke Works IV, etching, edition of 30, 29.5x43cm

Mikko Lagerstedt, First Snow
Resources:
www.mikkolagerstedt.com/gallery/resilience
This photo, and many other stunning images, can be purchased from the above link (print shop page) in various sizes as limited editions. I highly recommend a look through this talented artist’s website.
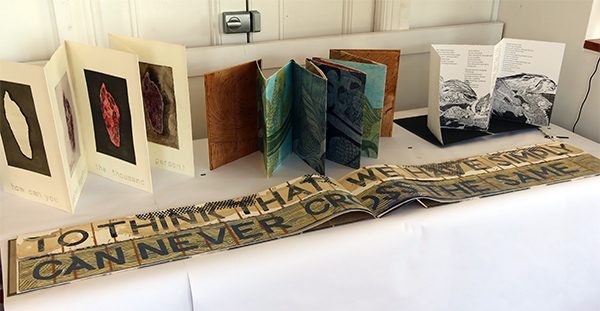
I recently visited the Clifton School of Arts to view an exhibition entitled Prelude: Artists’ Books Now. The 37 participants showcased some very innovative pieces, both in content and construction. Here are a few.
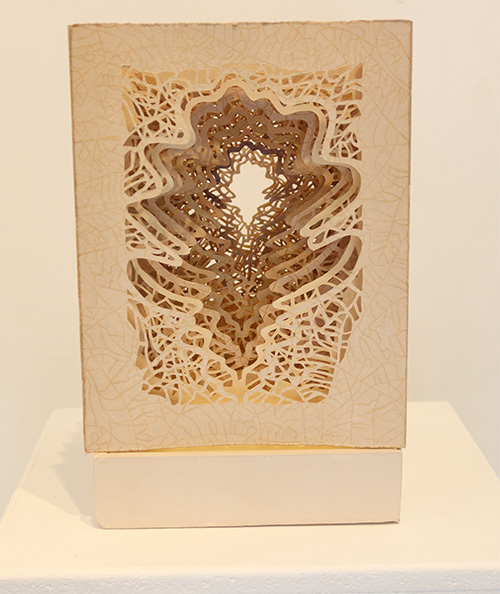


The one above really took my fancy. My husband, being French, took a minute to understand the title, but he got it. I fully relate to the sentiments expressed as I’m always wondering how to show my books in the best way.


Other gallery shots:

Following on from my previous solar plate prints I decided to create a relief linocut with the aim of masking and selectively inking specific areas to achieve colour and tonal variation.
Using Photoshop I created a mock-up of what I hope to be the final print. Additional components were added to reduce negative space and further balance the design.

The lino was cut and I took proof prints. Normally proofs are done in black but I wanted to look at potential highlight colours.

Masks were cut for each colour layer, a registration board was built using Ternes Burton pins to ensure accuracy, ink was rolled and the first two layers were produced.

Registration slippage was noted and (hopefully!) corrected.

Although this is a scan of the finished piece I see the orange looks rather faint. On the actual print it’s more vibrant and in evidence. Both the orange and the light grey were mixed with transparent medium and, in hindsight, that was probably not the best decision. There’s some very minor paper slippage but it’s not concerning.
This has been a huge learning experience when 100% accurate registration is required. Even 1mm out of place affects the visual outcome hugely in a piece such as this. Knowing fiddly registration can be challenging is what steered me away from a reduction print as I had no expectation regarding layering being precise. The masking method is fairly effective and the Ternes Burton pins registration works but when there is such a small amount of space between components, where there’s no allowance for error, this is the best print I could achieve – and I’m happy to accept it.
Late last year I visited MONA, the Museum of Old and New Art, in Tasmania. It was a fascinating experience and I was particularly enchanted with an installation entitled 20:50 by Richard Wilson.

His website describes it as follows:
The gallery is filled to waist height with recycled engine oil, from which the piece takes its name. A walk way leads from a single entrance, leading the viewer into the space until they are surrounded by oil on all sides. The impenetrable, reflective surface of the oil mirrors the architecture of the room exactly, placing the viewer at the mid-point of a symmetrical visual plane.
Needless to say, I took many photos and have adapted one as the inspiration for this print project.
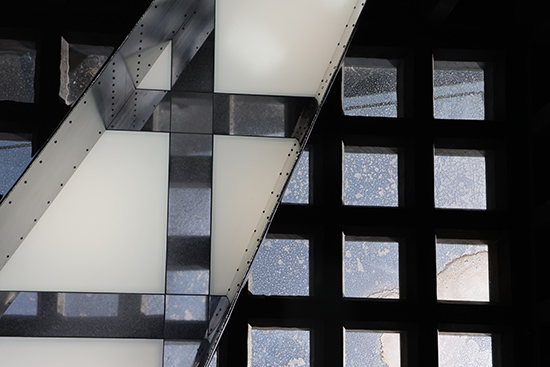
This photo is from a viewing platform overlooking the pool below and has been enlarged and cropped.
I made a basic drawing, added some colour and scanned it onto acetate to etch into a solar plate.

Once the etching process was complete I proceeded to pull some prints.

The line work has etched fairly crisply in most places but the tonal variations of the pen shading is quite haphazard. So why has this happened when the acetate image was very strong?
The main reason is the quality of the UV exposure light set-up we have at the communal studio where I developed the plate. Frankly, it’s not great, in fact it’s terrible. It’s a cumbersome process with light diffusing unevenly and not contained correctly within a regulated space to ensure solar plates receive the same amount of UV across the whole surface.
So, how to move forward seeing as I want to develop the design further? Next step: find another method of printing until I have access to a better quality exposure system.
Resources:
Image & some text – www.richardwilsonsculptor.com/sculpture/2050.html
Image – www.backyardopera.com/art-culture-4/2018/7/10/an-unfinished-guide-to-mona

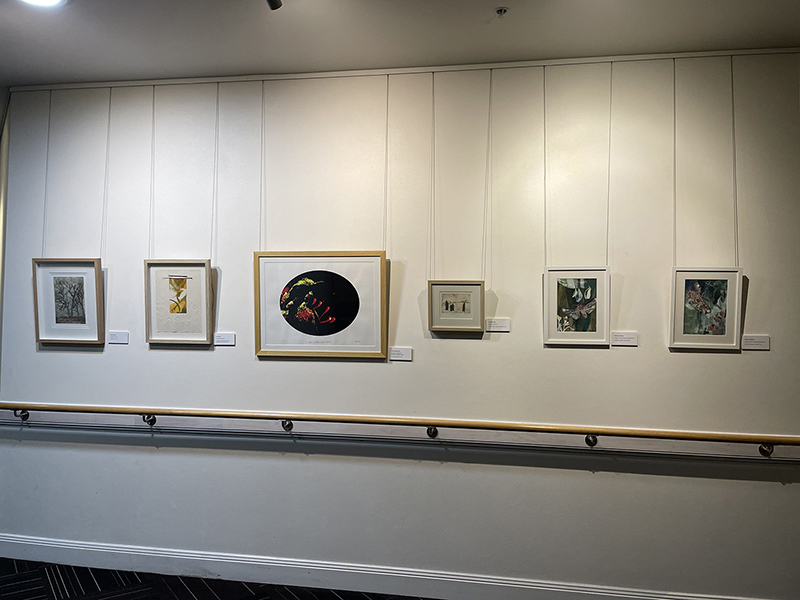
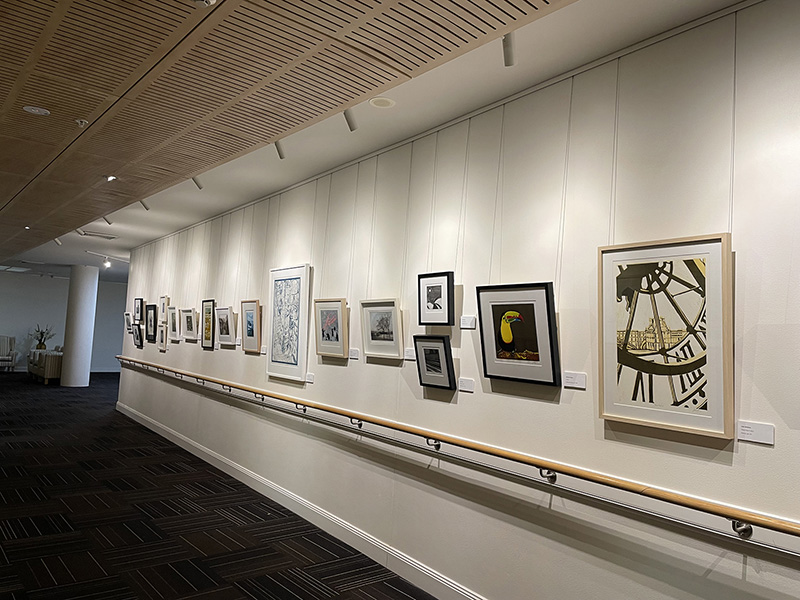
The Overwintering Project is an environmental art project that unites artists around Australia and New Zealand to raise awareness for the most endangered group of birds, migratory shorebirds, and their habitat. To join the project, artists are invited to visit, research, and respond to the unique nature of their local migratory bird habitat.

The Project was established in 2017 by printmaker Kate Gorringe-Smith and, while there have been over 40 exhibitions nationwide, the Overwintering Project: Jerrabomberra is the first in the ACT and hosted by Megalo Print Studio. Their catalogue describes it as an exhibition of prints created by local artists in response to the rich and diverse ecosystem that exists at the Jerrabomberra Wetlands.

I visited Megalo Print Studio a few weeks ago and saw the exhibition. It was fascinating to see the individual interpretations of the same theme and, as they allowed me to take photographs, I’m able to share some of the pieces here.

Unfortunately I’m not able to credit the images with the individual artists names – although some were evident on the works – as I found the numbering a little confusing and wasn’t able to match each piece to the catalogue name and description. However, I would like to say how much I enjoyed the variety of techniques used, the application of colour and the beautiful imagery.
You can find out more about the project here.
Resources:
Some text taken from The Overwintering Project: Jerrabomberra Wetlands catalogue
Photos by Claire Brach

Kevin Fletcher, Disused Dory Slip And Repairs Shed At Dusk, monotype, 2021, Edition 1/1
Resources:
www.davidsongalleries.com/
The Hand magazine, issue 42
I’ve seen quite a bit in the media about fast fashion; sales volumes generated by the fashion & manufacturing sectors, poor quality products designed with a very short life-span to encourage more purchasing, huge quantities of clothing going into land fill, and buyers with a never-ending appetite for the latest trends. Trends which are, of course, an invention by the vendors to keep their businesses going.
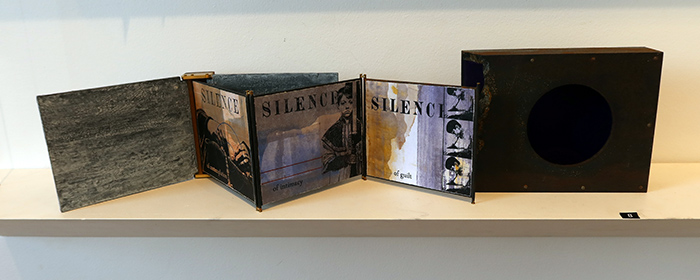
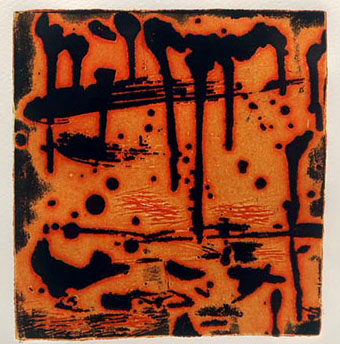
My project Reuse, Recycle, Repurpose is a small response to this. This work is an installation of 4 collagraph prints wound onto antique thread/ribbon spools. They’re displayed in this manner in the hope the viewer will grasp the connection between the printed images and texts, the physicality relating to the production of clothing, and the wastage mountains we find ourselves faced with.

The plate displays full washing lines, encouraging us to consider the lifespan of our clothing; washing & wearing repeatedly instead of washing, wearing and frequently replacing.


This plate aims to show a glut of purchased clothing, indicated on the right of the plate, (which will of course print in reverse), many of which are similar, if not the same. As the viewer’s eye travels across the image the items increase in size but reduce in number. This portrays a reduction in purchases where each item becomes more valued.


This plate reminds us that repairing, restyling and modifying our clothes is always an option. It just takes a bit of effort.


This print speaks for itself.
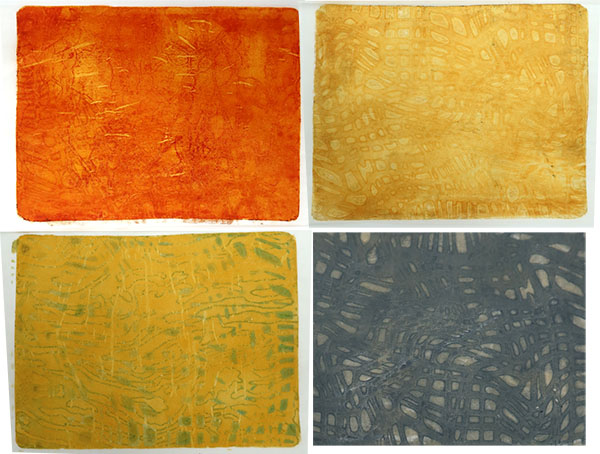
A while ago I created a very successful deeply etched solar plate image which was exhibited in April.

Last month two friends and I were keen to explore viscosity printing again and as I don’t have much in the way of deeply bitten plates, which is what is required, I picked this one to experiment with again.
The idea, essentially, is to combine intaglio printing with relief printing to create multi-layered and multi-coloured imagery. It works like this:
Because Colour 2 has a very high oil content it will reject Colour 3 as it is rolled over the surface and Colour 3 will only be deposited in the mid-depth sections of the plate.
So the composition of the plate and ink deposit will be: Colour 1 in the very deepest etched areas, Colour 3 in the mid to shallow etched areas and Colour 2 on the very surface where there is no etching.

In these pieces black was used as the intaglio ink, pushed into the most deeply etched parts of the plate. A very oily light blue was used as the second layer, lightly rolled over the surface with a hard roller, only touching the very top non-etched surfaces. A high viscosity off-yellow was applied as the third layer using a soft roller.
By applying some pressure the roller presses into the mid level surfaces and deposits the colour. This plate has a large heavily bitten area, the large white section, where the black ink was wiped away and by pressing with this soft roller it was able to reach into that area and leave some yellow. A quite different effect from the first image at the top of this post.

In the piece above you can see that I applied even more pressure to the soft roller with the yellow ink and managed to leave more ink than the previous print. However, I notice by doing this I’ve created a slightly smudged effect which is very evident towards the top left section.
Overall it is starting to look like a heavy dense image. My preference is for a lighter look and I still enjoy the original framed version.
The huge roller had sufficient ink transfer to it for it to be worth rolling onto proofing paper.

Click here to see the process that led to the framed print I created last year.

I took this photo while at Audley Weir a couple of weeks ago. My dilemma was whether to position the wall and water outlet on an exact horizontal line across the composition or to concentrate on the vertical positioning of the bollard reflections. I couldn’t have both and went with the reflections.
Perhaps I should have chosen this as my image of the week instead, taken at the same spot.

I’d like to create a concertina book with a whole array of handbags on display. Drypoint isn’t something I’ve done a lot of but using an etching needle to scratch into thin perspex seems like a good way to draw some small vignettes as a start point.

The above images were printed on 250gsm BFK Rives printmaking paper, soaked and blotted. Plate tone has been deliberately left as I like that effect.
Over time I have recycled my printing paper offcuts, pulped them and pulled new sheets. Whilst the original BFK paper has sizing in it, and can be soaked before printing, I knew that with the amount of water used to pulp and pull new sheets from the offcuts most of the sizing would be washed away. I was curious to see how the recycled paper would accept the same images.

Firstly, the indentations (embossing) around the plate are very deep, almost cutting through the paper. Secondly, although I printed on the smoother side of the sheets there is very evident texture in the background. That texture holds some of the ink as faint smudges.
And, thirdly, the images aren’t as sharp. There is an amount of bleeding around the line work. It’s more obvious on the originals than these small photos but when comparing the two above with the top images it’s clear there’s a difference. Take, for example, the two umbrellas: the folds on the hanging one are slightly fuzzy and the pole on the open one displays quite a bit of bleeding.
I also haven’t managed to get a nice smooth plate tone as per the BFK Rives prints.
However, I tried another two.

The smudged background effect remains, as does the deep embossing. The image on the left has bled a lot and the effect isn’t good. It appears as if I haven’t wiped the ink back sufficiently, which isn’t the case.
The handmade sheets couldn’t be soaked and blotted before printing or they would have fallen apart, having little or no size in them. But to enable them to grab the ink from the intaglio marks I lightly spritzed the sheets, then blotted, before printing. It’s obvious the paper has retained the water, become too soft and created blurring in the transferred images.
This isn’t a project I can continue with using these papers, especially if I want to hand colour selected areas. It’s back to commercial paper after I’ve drawn some more designs to add to the collection.
I love images of mushrooms, fungi and slime mold. I’ve taken many photos myself but nothing I find compares to the brilliant images I find online. The variety is astounding, the shapes, colours and sheer visuality of many are otherworldly.

Just superb! And this, as was kindly pointed out to me in the comment section, is a slime mold.
Resources:
http://www.thisiscolossal.com/2023/08/barry-webb-fungi-photos/
As a member of Papermakers of Victoria I was invited to participate in their latest exhibition at Nunawading Library.

Living so far away means I won’t get to see the pieces on display but I’ve received a few good photos.

Pretty happy with the way my ‘Marks in Nature’ book looks here. Although the photo doesn’t show the inside, visitors to the library will be able to see the printed pages as the shelving is double sided so items can be viewed front and back.


Resources:
Library image: http://www.wml.vic.gov.au/Libraries-Hours/Nunawading-Library
Other photos by Gail Stiffe and Rosalind Price
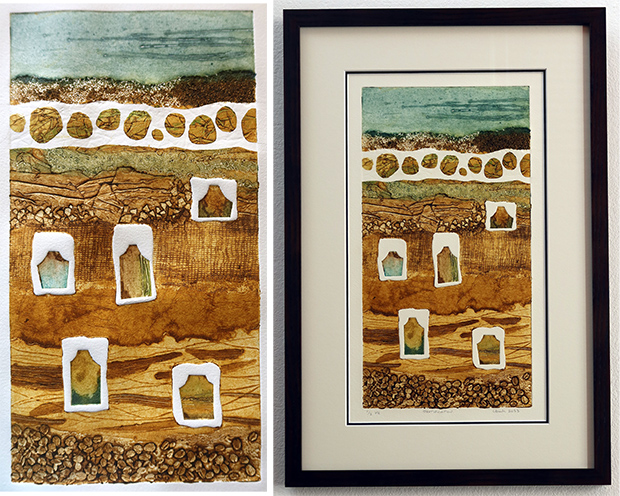
The Southern Printmakers exhibition ‘Inside Out’ which I participated in during June this year was a huge success. We had a large turn out for the opening and many visitors throughout, which resulted in several sales. I exhibited my piece entitled Stratification and you can see the making, printing and framing of it here.
At the end of the event the group was delighted to be asked to hang the works, and others that fit the theme, in Moran Gallery in Sylvania until mid November. The gallery is located in the Moran Health Care Group’s premium residential aged care home and are a big supporter of Hazelhurst Arts Centre where we first exhibited. Their website states:
Moran Health Care Group is a major supporter of Hazelhurst Arts Centre in the Sutherland Shire of Sydney as a Principal Partner supporting their active arts programs for the community.
Through this collaboration, the Moran Gallery hosts a series of exhibitions that aim to enrich the day to day lives of Moran Aged Care residents at Sylvania and Engadine, their families and the Sutherland Shire community.

It’s lovely to know we have our works there and they bring joy to the residents, staff and visitors every day.
Note: Protective clothing, including gloves and face mask, should be worn when using toxic substances.
Spurred on by a printmaking workshop I attended last week, where my results were approximate at best, I’ve spent the last few days working on etching into lino in a more successful manner than I achieved during the class.
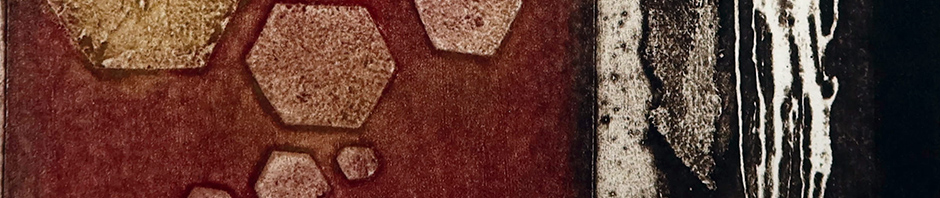
I first played with lino etching nearly 4 years ago (posted here) where a wax resist used as stop-out was applied to certain areas and then the entire piece was immersed in a fairly diluted caustic soda/water solution. The exposed areas were ‘eaten’ by the caustic soda solution before the lino was scrubbed and dried, then printed. I progressed to intaglio inking the etched areas, with a second colour rolled over the surface (shown left). The orange is the intaglio and the sepia is the rollover where the wax resist had been.
In the method described above the negative space, i.e. the area you don’t want to etch is painted with a resist – wax in this case – and the remainder will etch. You need to be aware of the back and edges of the lino as if they are not sealed they will also be eaten away.

I’m now exploring another method: the areas I want to etch are painted with the corrosive product. This may seem straightforward but diluted caustic soda runs across the lino and tends to bead or pool on the surface. Precision can’t be guaranteed.

Paint stripper, with the consistency of thickened fluid, can potentially replace this and be used in a painterly manner. In the sample, above left, you can see the clear difference in application between the pooling caustic soda solution and the painted coverage of the paint stripper.
On the right is my painted piece. Once dry, the lino was run under the tap and scrubbed to remove the etched surface.
First lesson learned: Caustic soda solution can be made to varying strengths, so you can do a slow gentle etch, checking along the way, or a much quicker violent etch. To stop the etch the lino can be immersed in a water bath.
Paint stripper is weaker but you can allow to dry then reapply multiple times.
Second lesson learned: Caustic soda solution, being fully liquid, is self levelling and will etch fairly evenly. You can achieve good depth with clear sharp edges.
As paint stripper is not self levelling it will create much more texture, although shallow, and the edges will be softer.

Above left: First print, from the workshop. Ink was dabbed onto the lino in multiple places then spread using a small piece of cardboard which was dragged across the surface. Tarlatan was used to push ink into the recesses and remove excess ink from the surface. The paper was supplied and was thinner than I’d normally use and only soaked for 1 minute.
Above right: Second print, also from the workshop. Ink was applied the same way, ditto tarlatan wiping. Using my finger I rubbed yellow ink onto some relief areas and wiped back using my palm gently against flat tissue paper. This was printed on my own 20- minute-soaked BFK Rives printing paper.
They’re both terrible results. NEVER in my own studio or when I teach would I squeeze printing ink directly from the tube onto a print matrix – any type of print matrix. Inks need to be modified to achieve the correct consistency and strength, then applied using a ‘spatula’ of cardboard, a toothbrush, a roller, a piece of tarlatan or finger tip.
Back home I went through the etching process a second time, reworking the original etched areas. The paint stripper was left on for 36 hours before removal.

Using both a scrubbing brush and a nail brush didn’t remove much more lino at all, so I used this burnisher and proceeded to scrape the etched sections. They were softer than the non-etched areas and started to come away but are still not terribly deep, but workable. Having been soaked and dried several times the lino was horribly bowed as shown in the photo. I just manhandled it back into shape! Or should that be ‘womanhandled’ it?
Using a toothbrush, ink – blue in places, dark green in others – was forced into the etched areas which, of course, caught some of the relief sections as well. A pad of tarlatan pushed the ink into the textural areas before surface wiping using tissue. This removed most, but not all, of the ink from the non-etched parts. I prepared my relief colour, rolled it out onto a glass slab to ensure the roller/brayer was lightly, and evenly, coated and rolled it carefully across my (now flat!) lino.

A significantly better result. However I had 3 attempts before I got here.
Third lesson learned: The rollover has to be done with minimal ink, very lightly applied to the surface with a slightly soft roller. If the roller is too hard it simply skids across the surface and doesn’t deposit an even coating. If the roller is too soft, and any pressure is applied when rolling, it catches a significant amount of the etched areas and deposits colour. The paint stripper etching, despite having been done twice, still remains very shallow so is likely to pick up some of the surface colour no matter how careful you are.
It’s a bit of a fiddly process but I can see uses for it. For example, if lino is being used to produce landscapes and similar the etching could be drawn as clouds and tonal variation could be achieved in sky, sea or foliage. None of those require exacting results so this technique could be helpful.
It occurs to me that once the initial paint stripper etching has been done, and there is at least some surface removed, a caustic soda solution could be carefully applied to the area to deepen the etch and create sharper edging to the shapes. The semi-etched areas should form a recess where the solution can pool and stop it running away and ruining the remainder of the lino. This assumes you want a deeply defined etched piece of lino.
Over recent weeks I’ve been in the papermaking studio creating some new sheets for myself.
At the end of June my friend Dinah and myself pulped some unidentified plant fibre which quickly disintegrated and we had to add some other white pulp to the beater to produce something usable. I showed images of it here. I’ve now pulled some sheets from it as well as other pulp in the studio.

The top sheets are from the plant fibre/cotton rag pulp mix. The bottom row shows, from left to right: denim paper (from jeans), green hessian paper (from a hessian cushion cover), some hessian fibre mixed with yellow recycled folders, and finally just recycled yellow folders paper.
You’d think the paper from cardstock folders would be more vibrant as they are brightly coloured before we use them. However, I’ve found that many folders, when torn, are actually white inside – the colour is only a coating. So once they are shredded and pulped they often end up a lighter creamy tint of their original exterior. That’s what has happened in the ‘yellow’ papers shown here. In my case, it makes them more usable than bright primary coloured sheets.
I’m a fan of jigsaws. I like the idea of pieces slotting together to create a whole, of components that complete a picture. I’ve several ideas for printing individual pieces which can be swapped, rearranged and grouped, forming a variety of outcomes.
Last week I spent time in Canberra printing with the amazing Basil Hall in his studio. We were a small group of four working with Basil over three days. It was a perfect opportunity for me to start my exploration into creating and printing multiple pieces.
Basil is a brilliant and professional printmaker. He is very well-known and highly regarded and I value every bit of advice he gives me. Even though I consider myself fairly experienced in creating collagraphs his method results in different visual outcomes to what I would expect working alone in my own studio.
You might ask why results vary when collagraphs are, essentially, always assembled in a similar way: create a low-relief multi-layer matrix, ink it up, wipe it back and put it through a press to transfer the image to paper. However, there are many variables –
My design pieces were cut from mountboard. The surround was saved for future use.

I chose colours I wouldn’t normally print with; stormy grey, process blue and green. Very cool and moody outcome.

Although this works quite well I felt it needed lifting, so I swapped the green for a red mixed with a tiny amount of black. I also added pale yellow Iwaki paper as chine collé.

The result already appears more interesting. I moved to more earthy colours.

These were a combination of stormy grey, golden sands, green and purple. I’m really happy with how this project is developing.

A change of focus and differing amounts of wiping back. It’s a good start and I’ll continue developing these over time.
Whilst scrolling through my photos for something to use as a start point for a new project I came across this image my husband took in October last year.

It’s so easy to walk right past interesting textures and shapes without noticing but when you pay attention it’s surprising what you discover.

Multi layer print and collage.

Chine collé and drawing.

Gelli plate peel print using dried plant material.
Now to put the book together.

Masked acrylic paint prints using clingfilm to create texture.

Multi layer chine collé and paint.

Gelli plate peel print using dried plant material.

Masking and chine collé.
Messing around in my sketchbook. The aim was to combine both random and calculated shapes using a reduced colour palette.


I like both orientations but possibly the landscape one slightly more.
Chine collé and other collaged pieces of handmade paper were included here.

The stencil was used as a mask to achieve this negative image transfer.

Overlaid chine collé pieces.

Plant dyed tissue was slightly crumpled and adhered to the base paper to achieve this effect.

The carved lino was initially rolled with Stormy Grey oil-based ink. Prior to printing I decided I wasn’t going to like the colour against the (mainly) banana fibre paper so, to remove the ink and start again, I sprayed the lino with citrus-based multi-purpose cleaner. This created a ‘bubbly’ effect in the ink prior to cleaning. Suddenly I liked it, the effect gave the surface a pebbly look. So I printed it.
Because the solvent was sprayed it also reached the lower carved areas of the lino and as it went through the press with the paper the solvent marks were transferred, staining the page. Hence some of the additional lightly-marked fine lines.

Torn printed paper was initially adhered to the surface before overprinting with Terra Firma oil-based ink. There is an obvious colour change where the ink has been applied over the chine collé deli paper, which I like. A mask was cut so only selected sections of the inked lino was transferred.

This piece was printed in the same manner as the previous one with only a change of ink colour.

Chine collé papers were adhered and overlaid, with a small amount of added pen work. I regret the 2 small orange marks but as they’re now done I have to live with them. Considering the overall content of the book they won’t really stand out, I guess.
Having cropped my chosen image (see previous blog post) I cut a piece of lino in reverse.

To provide more options I also designed and cut a stencil along similar lines. The stencil is shown on black paper so it’s more visible.
The lino was inked and a proof taken so design and cutting could be checked.

Some of the interference marks were cut away to create a cleaner print – they are most evident at the bottom right of the image above.
This book will be submitted for an exhibition that requires the use of handmade paper, so I selected my sheets.

I’ve chosen three different, but related, papers I made myself.
The sheets were cut to size ready for printing.
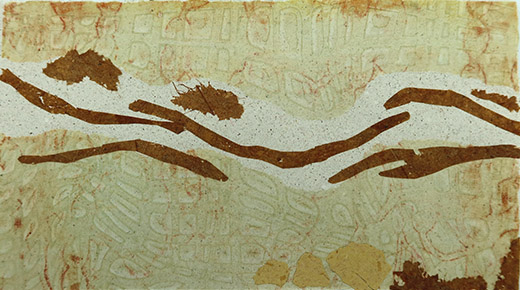
Over recent weeks I’ve been whale watching on the cliffs of Cape Solander. It’s a windswept, fairly barren, area with walks high up along the coastline.

No, that’s not me in the image above. It’s someone a little more daring than I care to be on a blowy day!
Prior to these last couple of months I hadn’t been there for a long time, in fact since I went SCUBA diving in the area over 20 years ago. Anyway, my husband and I were lucky enough to see whales travelling north, and we took a walk south along the cliffs photographing the amazing striations and crevices created in the rocky surfaces. Such fantastic inspiration for future printing projects.

The ground is very uneven, appearing multilayered in places with huge boulders, but there are also large areas of subtle undulations in the rock surfaces.

Constant wind has formed holes and textural surfaces.

I’ve chosen the image below as inspiration for my next project – a handmade book entitled Marks in Nature.

I’ll show some of the pages and explain my process over coming posts.

Bridget Fischer, polyester plate lithographs, 6″ x 4″ each. www.bridgetfischer.com
These images come from The Hand, a magazine for reproduction-based art. The publication has some incredibly talented contributors and so many techniques I’ve either never heard of or haven’t yet tried. I’m constantly astounded by the creativity and skills of the chosen works.
Resources:
The Hand magazine, issue 40, page 37
A couple of weeks ago I was at the paper arts studio with a friend to check and replenish our supply of paper pulp in preparation for a beginners workshop.
There was no plant fibre pulp but we found a bucket with some unidentified plant fibre soaking, ready for the beater. It was incredibly fibrous so we thought the Hollander beater would make a good job of macerating it and after about an hour – or a bit less – we would have some excellent pulp to decant into buckets ready to use.
Once the beater was operational we started pulling the wet fibres apart and dropping them into the water.

After three minutes Dinah could see it had broken down enormously. We checked the operational part (under the guard) and found some lumps which we pulled apart and then turned the machine back on. Dinah has a lot of experience, knows what the machine should sound like when it is working and can tell when the pulping process is complete. She only ran the beater for another minute before we rechecked the contents. To our utter amazement the fibres had totally disintegrated to virtually nothing.
You can see from the image below left that there was nothing remaining to create paper sheets. It was bizarre and neither of us had seen this happen before.
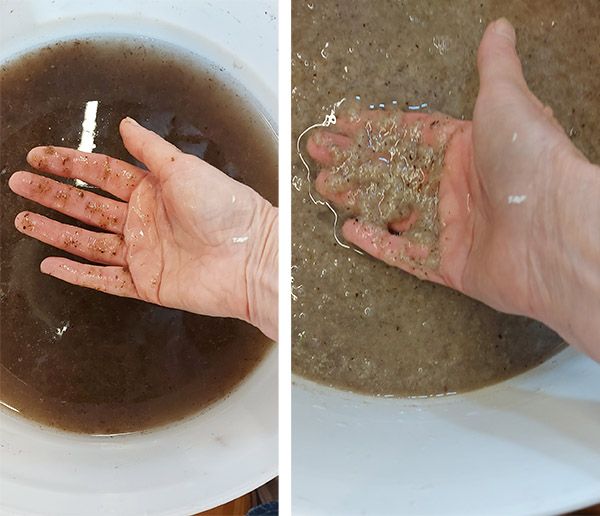
To ‘rescue’ the fibre we drained some liquid off and added white cotton paper pulp and ran the beater for about a minute to combine them. From the image above right you can see this was a success and we achieved a great looking pulp with tiny darker flecks throughout.
On Saturday we used quite a bit of it during our paper making class and the results look terrific.

I’ll be back there in a couple of weeks to use it to make paper for myself. This was a lesson for our students, showing them that if things don’t work out first time there’s always a solution – you just have to find it.
What better way to advertise the amenities than this, captured by my clever husband with camera in hand.

Wonder what was on the female side!

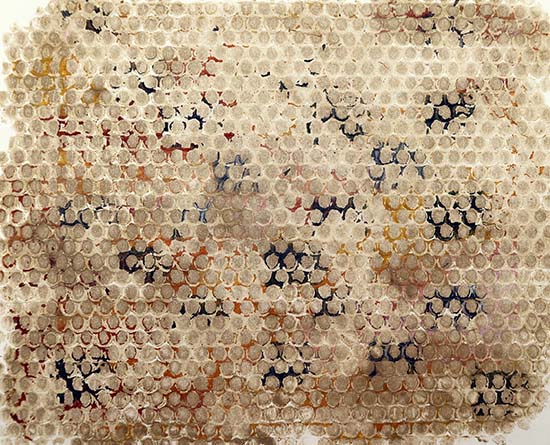
Earlier this year I posted some experimental collagraph plates (here and here) in anticipation of creating a larger finished work.
In 2021 I worked on a print called ‘Hidden Vessels’, shown left, which never made it to this site as I wanted to improve the concept and achieve better imagery. The idea was there but the execution needed some work.
The small vessels were created from a very thin sheet of cork, applied over collaged teabags. A nice idea but the profile of the cork was too high in regard to other components and there were inking issues, although other areas have come out well. I especially like the yellow ochre section at the bottom.
My new project is aimed at continuing this theme, with improvements, and learned outcomes from the other experimentation I mentioned in my first paragraph.
I’ve called this piece ‘Stratification’ referencing the geological meaning: formation of strata, deposition or occurrence in strata. My piece represents layers of sediment, rock, debris and flora & fauna, compressed over millennia.
Britannica tells us that geology was revolutionized in the early 19th century with the discovery and demonstration of the principles of uniformitarian stratigraphy, which determines the age of fossil remains by the stratum they occupy below the earth. The site includes references to early stone tools and artifacts unearthed and now dated
I cut ‘pockets’ within the strata layers of my collagraph plate ready to insert my own hidden vessels.

The shellacked layers, on mountboard, include porridge oats, dried plant fronds, handmade paper, carborundum over glue, scrim, eggshell, corrugated cardboard, webbing spray, masking tape, molding paste, miniature railway ballast, clear tar gel. The surface has also been scraped and cut in places.
Parts of the plate were cut away before sealing. I then created my vessels.

And here it is printed, and framed ready for exhibiting.
Resources:
http://www.britannica.com/science/archaeology/First-steps-to-archaeology

Bob Cornelis, Unspoken Journey
I enjoy the complexity of this image, especially the asemic writing. This is one piece from a series entitled Unspoken Journey, with each of them displaying a form of ‘text’ or communicative symbols.
Over the past couple of years I’ve developed my own set of symbols, nothing like these, which I would like to incorporate into my future work. The sense that a message is being conveyed, albeit incomprehensible, is intriguing.
Resources:
http://www.bobcornelis.com/Galleries/printmaking/unspokenjourney/